Getting Started with Kadena Relay App in Testnet
Part 1: Create and fund a testnet KDA account
Part 2: Create a Bond on Kadena Testnet
Part 3: Install and Run Kadena Relay App on Testnet
Part 4 (bonus): Rotate, renew, and unbond your bonds.
Part 1: Create and fund a testnet KDA account
You’ll first create a testnet KDA account (will be referred to tKDA account in this article) in order to create a bond on Kadena testnet. If you have a Zelcore or Chainweaver account, you can use the account from Zelcore. Otherwise, you can generate a keypair from kadena-transfer-tool to create the account.

-
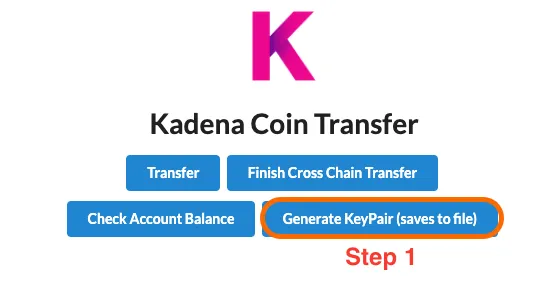
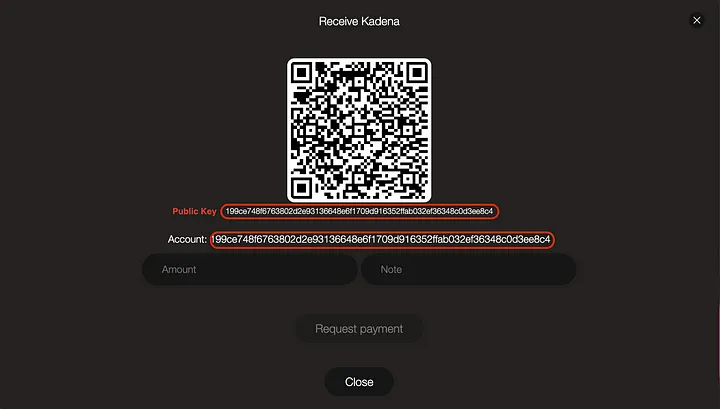
Visit the kadena-transfer-tool and click on “Generate KeyPair.” A file that contains a set of public key and a private key will be downloaded. For Zelcore users, click on “Receive” to find your account name and the public key.
-
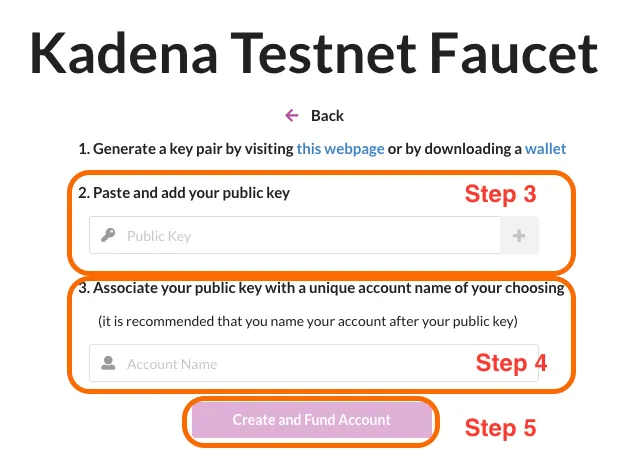
Visit Kadena Testnet Faucet and click on “Create and Fund New Account”. If you already have a tKDA, click on “Add Funds to Existing Account.”
-
Paste in the public key from Step 1 and add to keysets by clicking “+”.
-
Fill in the account name. We recommend using the public key as the account name.
-
Click on “Create and Fund Account”
You now have a testnet KDA account with a balance of 20 tKDA.
Part 2: Create a Bond on Kadena Testnet
- Visit the Testnet Chainweb Relay Website. This website allows you to manually create a new bond, and manage existing bonds.
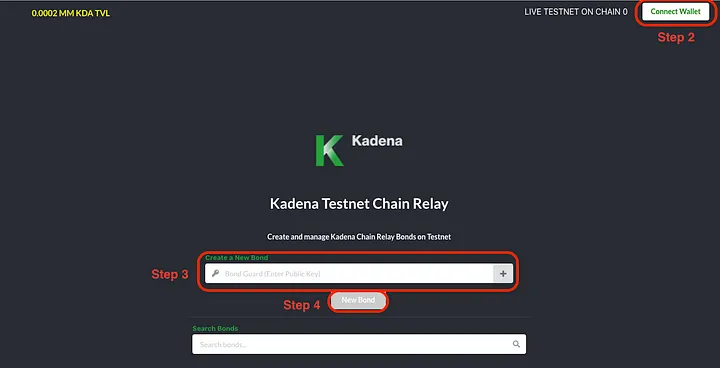
2 . Click on “Connect Wallet” on the top right, and paste in your account name. Then set the signing option to preferred method.
-
Paste in the public key in “Bond Guard” that you will use to manage the bond, and add to the keyset by clicking “+” button.
-
Click on “New Bond”.
Once the transaction is complete, you’ll see the bond details after refreshing the page.
Part 3: Install and Run Relay App
Before running app, you should have a relay bond and an infura project. Follow this guide to create an infura project.
- Set up Bond Details.
Create an .env file with the template below and fill in the details.
DEFAULT_ENV=kovan # Infura project ID INFURA_API_TOKEN= # Relay-app settings (always required) BOND_NAME= PACT_PRIVATE_KEY= DEFAULT_ENV=kovan # Infura project ID INFURA_API_TOKEN= # Relay-app settings (always required) BOND_NAME= PACT_PRIVATE_KEY=**INFURA_API_TOKEN — **the project ID of your infura project. BOND_NAME — the bond name that will be listed under “Your Bonds” in Chainweb Relay Testnet website. PACT_PRIVATE_KEY — the private key of keypair used in the bond.
If you used the public key from Zelcore, or want to use a separate keypair to manage the bond, look at part 4: Rotate to rotate your bond guard to a separate keypair.
- Install and run the Relay App.
The software listens to Ethereum Testnet for transfer activities to a “lockup” account and propose or endorse the header information on Kadena Testnet. If the header is proposed, the Kadena Testnet emits PROPOSE events, which the app will listen and endorse. When the app succeeds in endorsing the proposal, then the bond will have earned a new activity.
There are two ways to run this software: Docker or npm.
Run via Docker:
docker run -v "$PWD/.env:/app/.env:ro" kadena/relay-app docker run -v "$PWD/.env:/app/.env:ro" kadena/relay-appRun via npm:
npm install --global @kadena/relay-app:latest relay-app npm install --global @kadena/relay-app:latest relay-appAdvanced: Generate lockup events on Ethereum testnet
In order to create the headers to propose or endorse, there needs to be transfer activity to lockup account on Ethereum Testnet (We default to Kovan network). You can learn about creating these events here.
Part 4(bonus): Rotate, renew, and unbond your bonds.
Rotate
Although bond guards can be identical to tKDA account guard, user can use a separate keypair to guard the bonds. This is to allow the wallet users to use a keypair to be used in the bond software.
To Rotate, go to the testnet chainweb relay website.
-
Click on Bond Name, and then click on “Rotate”
-
Paste in the public key of the keypair that the bond guard to be rotated to. You can create a new keypair using the kadena-transfer-tool .
-
Sign with the preferred method with the tKDA account guard.
-
Click “Confirm”
Renew / Unbond
The bonds need to be renewed after the lockup period (10 days). Once the renew period ends (10 days), then the bond can be unbonded. The buttons will be active once the renew / unbond period begins. The steps are similar to ROTATE, with only one difference — it needs to be signed with the bond guard, not tKDA account guard.
-
Click on Bond Name, and then click on “Renew” or “Unbond”
-
Sign with the preferred method with the bond guard
-
Click Confirm
You now have a bond on Kadena Testnet and a way to earn activity using the Kadena Relay App! Join our Discord channel for any technical questions regarding the relay app!
